How To Airdrop From iPhone To Mac And Mac To iPhone
AirDrop lets users wirelessly send files between Apple devices. Because it uses Bluetooth technology, it relies on devices being in close physical proximity to each other. It’s a handy way to quickly share files, photos, etc. without the need to draft an email or message. Plus, AirDrop files are encrypted, so it’s also secure.
Make sure you follow these steps beforehand so that you’re good to go:
-
Turn on Bluetooth and WiFi. You do not need to be connected to a WiFi network but the WiFi setting does need to be on. Also, turn off your hotspot if it’s on. AirDrop won’t work otherwise.
-
Make sure that the devices are within range of each other no more than about 30 feet apart.
-
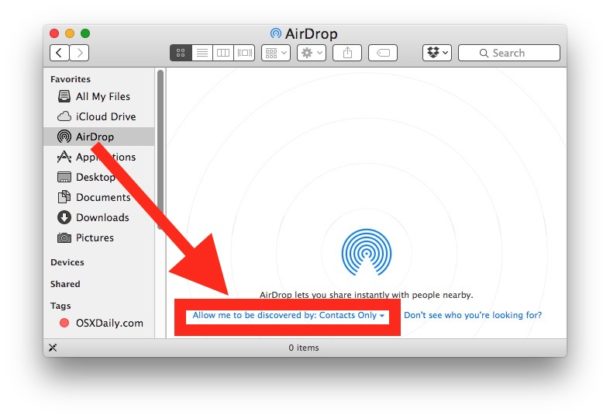
Check the AirDrop sharing settings of the device that is receiving the file. The settings are “Receiving Off,” “Contacts Only,” or “Everyone.” If you choose to only receive files from contacts, make sure that the owner of the device sending the file is saved as a contact. You can adjust these settings in your Control Center or by going to “Settings” > “General” > “AirDrop.”
How To Send Photos And Videos Via Airdrop In Original Quality On iPhone
Finding Airdrop Files On An iPhone Is A Little Different Than Mac
When it comes to sending files with Airdrop between iPhones, or from OS X to iOS, there may be a little more hunting involved to find just the spot where some files may have ended up.
The easiest ones to find are photos and videos. Anytime these two file types are Airdropped to an iPhone, they are automatically deposited into the app.
However, in many cases the photo will be placed within your photos based on when the actual photo or video was taken, not the date or time when the Airdrop took place.
So if you plan on Airdropping a photo from several years ago, you may find it automatically pulled up within the photos app right away, but if you want to find it again after closing out the Photos app later, it will require some digging back to the date of original shot.
Dont worry if an old photo or video from a recent Airdrop is not readily seen saved in Photos, its most likely buried in there somewhere are it just needs to be dusted off again!
Recommended Reading: How To Play Gomoku On iPhone
Why Is Airdrop Not Working On My Mac
If your attempts to send files have failed, check one of the following possible reasons:
- Make sure that Wi-Fi and Bluetooth are on on both devices. The reason they are not working might be that Airplane or Do Not Disturb mode are turned onWi-Fi and Bluetooth wont be available if thats the case. Open the Control Centre to check: when the modes are inactive, the new moon and the airplane icons are greyed out. When activated, the airplane is orange and the new moon is purple. To turn off the mode, tap on the icon.
- If Wi-Fi and Bluetooth are on but the problem persists, you might need to check the settings of the devices that are taking part in file exchange. First, make sure that your iPhone or Mac are discoverable by everyonesometimes even the Contacts Only setupmakes you inaccessible by other users.
- Check that youre not too far away from the receiving device. AirDrop only allows data transfer if the two devices are no more than 9 metres apart, otherwise they wont detect each other.
- Its possible that one of the devices is glitchingsimply restart them both.
- If youve gone through all the solutions listed above with no luck, its most likely that one or both of the devices operating system is out of date. This can cause them to not align with the system requirements for AirDrop. In this case, your options are either to update macOS or buy a more modern piece of tech.
Read more:
Tips To Upload Photos From Mac To Icloud

Besides that, it also lets you upload photos from Mac to iCloud directly, and then photos will be synced to your iPhone when you have logged in with the same Apple ID.
Step 1: Get AnyTrans on your computer > Go to iCloud Manager and click Sign in to iCloud > Enter your Apple ID and password.
* 100% Clean & Safe
Step 2: Click on the Photos option.
Step 3: Click the Upload button at the top-right corner > Choose the folder that contains the photos you want on your Mac and select the photos > Click Open button to upload photos from Mac to iCloud.
Upload Photos from Mac to iCloud
Recommended Reading: Remove Email Account From iPhone
Transfer Files From Mac To iPhone Using Airdrop
Once your Mac and iPhone are setup to use AirDrop, it becomes really easy to transfer Files, Photos, Videos and other Data from Mac to iPhone.
1. Click on the Finder icon located in the Dock of your Mac.
2. In the Finder windows, click on AirDrop option, located in the left-pane.
3. Select the File that you want to transfer to iPhone and drag the File into the iPhones circle .
How To Use Icloud Photo Library
iCloud Photo Library is probably the easiest way to keep your photos on Mac and iPhone in sync, but you do need a newer Mac that can get the on it . Here’s how to enable the iCloud Photo Library.
Make sure that the iCloud Photos option is checked.
If this is the first time you are launching Photos on Mac in macOS Catalina or later, you may need to make sure that the System Photo Library is on before you can enable the iCloud Photos option.
In the Preferences for Photos app, click General.
Click Use as System Photo Library. It may take a little bit of time to complete.
When you have the iCloud Photos option enabled on your Mac, you will want to ensure that it’s also enabled on your iPhone or iPad.
Scroll down and tap on .
You can also turn the toggle for to ON if you want to share your iCloud Photos albums with others.
Once iCloud Photos is enabled, it may take up to 24 hours before all of your content is synced up between devices. iCloud Photos also won’t sync unless you’re on WiFi, so make sure that’s good to go before wondering where all of your content is.
You May Like: 8 Ball Pool Imessage
Import Photos With Image Capture
Start by connecting your iPhone to your Mac using the phones charger cable.
Open the Image Capture app on your Mac. If prompted, unlock your iPhone.
In the left sidebar, select iPhone. Your iPhone photos will appear in the main part of the window.
Now you need to select the photos you want to import. To select individual photos, hold down the Command key as you click the images. Selected photos are highlighted blue.
Or to select a group of photos, click the first photo, then hold down the Shift key and click the last photo.
Once youve selected your photos, click into the Import To box at the bottom of the window.
Select the folder you want to copy the photos to. For example, you could copy them to the Pictures folder on your Mac. To view more folders or create a new one, click Other in the pop-up menu.
When youve selected your destination folder, click Import.
Would you rather import all images from your iPhone? Click Import All instead of selecting individual photos.
How To Copy Photos From iPhone To Mac With Flickr
Flickr is one of the most powerful and popular cloud services of photos storage. You can utilize it to download photos from iPhone to Mac without problem. Before download photos, you have to install the program on both your iPhone and synchronize photos to Flickr.
Step 1: Launch browser on your Mac computer and enter flickr.com in the address bar. It will ask you to log in your account. After sign in, click “You” on top of the page. The photos will show up.
Step 2: Select the photos you want to download to your Mac computer. One of the most useful features of Flickr is to allow you to decide the size of photos to download. You can find this option in “View All Sizes” at the bottom right corner.
Step 3: Decide the size and then click Download. Choose a destination to download and click “Save” to start to download photos from iPhone to Mac. The browser will save the photos in a zip file.
Don’t Miss: How To Connect iPhone To Samsung Smart Tv
Before You Airdrop Photos From iPhone To Mac
If youre moving a bunch of photos from a specific moment say, that road trip you did last weekend the transfer time will depend on how many photos you took. And it can take forever to AirDrop photos if you took too many. So make sure youre only transferring the photos you need, not those blurry shots that didnt turn out well or dozens of photos that look almost the same.
Gemini Photos will help you declutter your photos before moving them to your Mac by finding and deleting stuff like:
- duplicates
- old screenshots
So be sure to and run a scan before you start choosing the photos to AirDrop.
How To Airdrop From iPhone To Mac
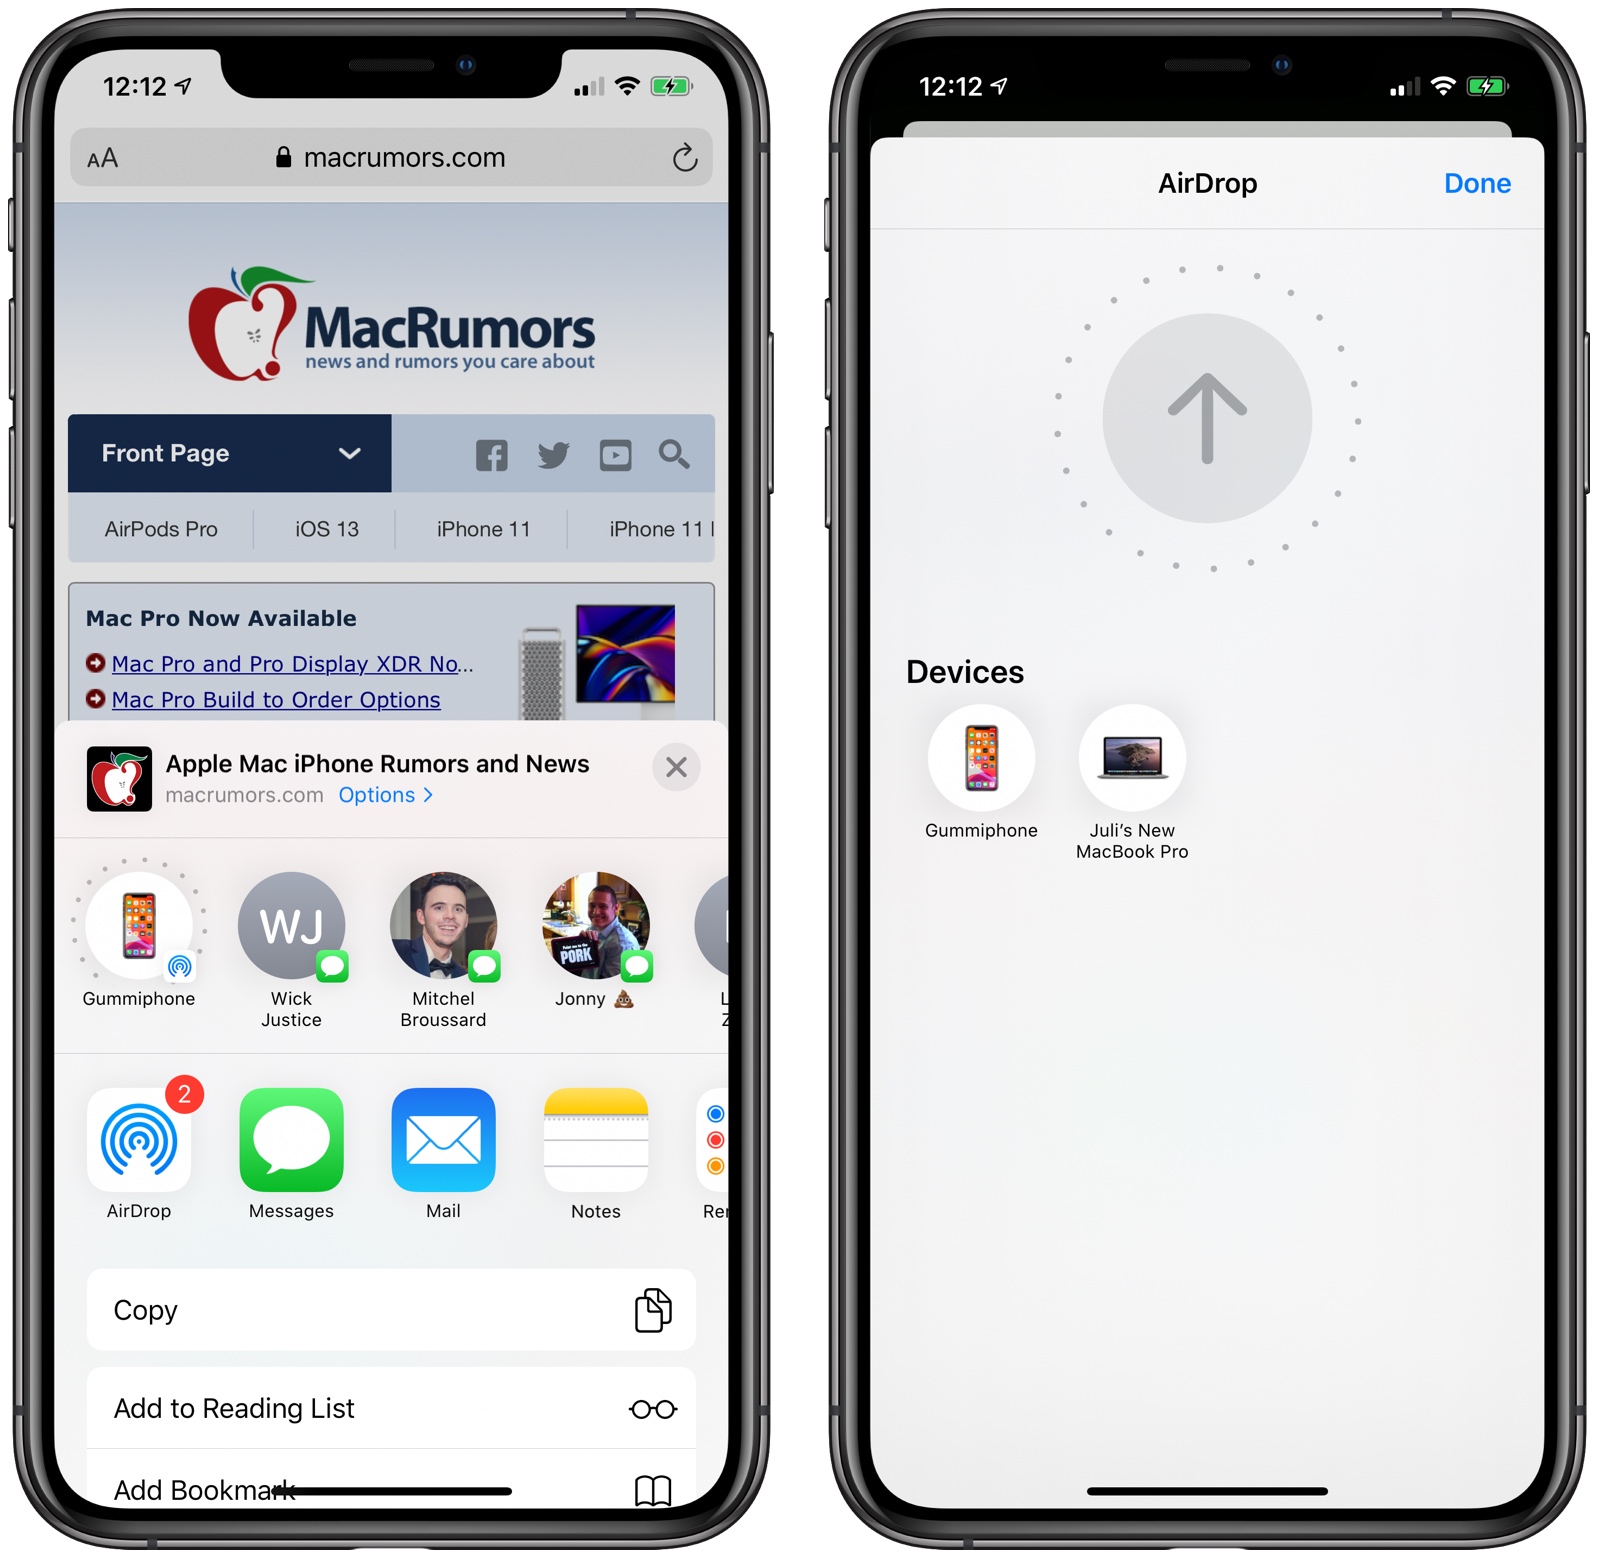
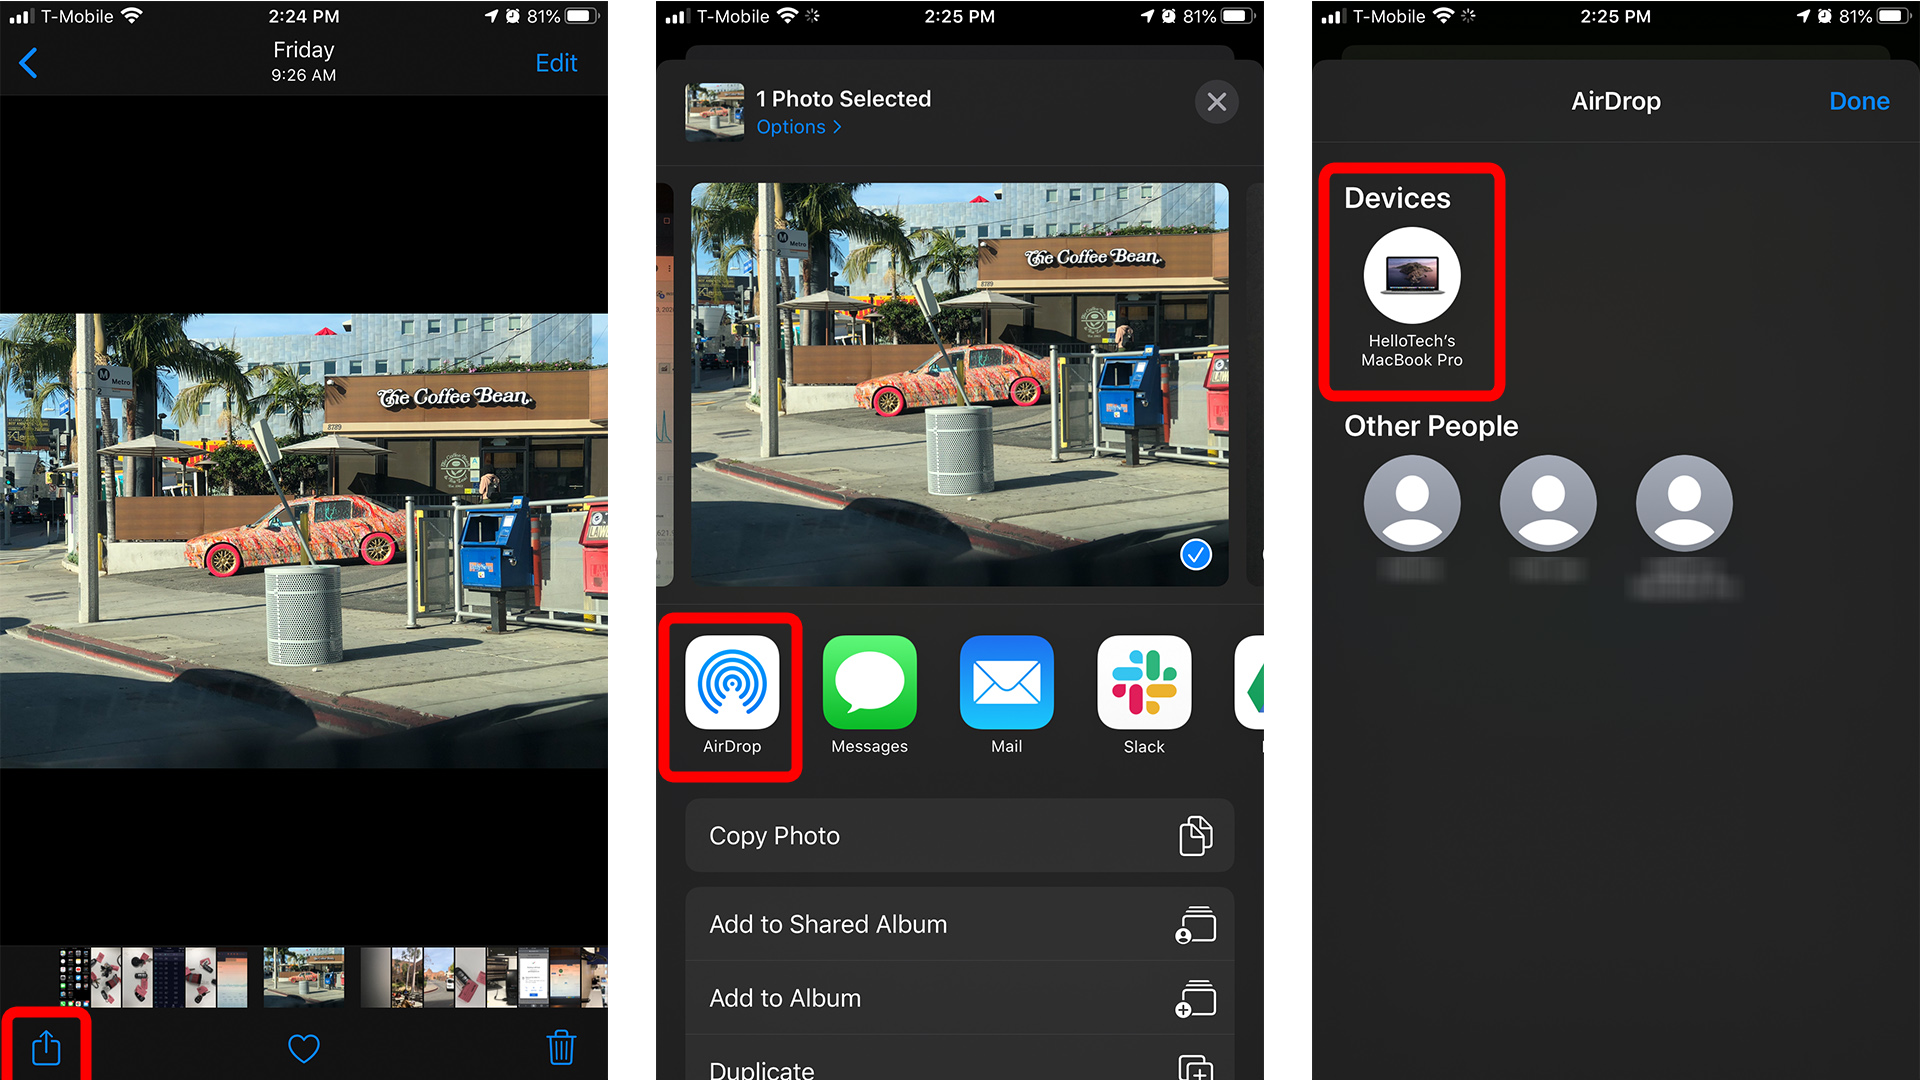
Open the file that you want to AirDrop, then tap the share icon, which is the square with the upwards-facing arrow.
That will show you all of the ways you can share a file. Tap the AirDrop icon, which is the concentric circles with a triangle cut out at the bottom.
From there, select the user/device that you’d like to send it to. Tapping the user/device automatically starts the AirDrop process. If no devices are showing up, double-check that all of your settings are correct.
To accept an AirDrop on your Mac, a preview window will pop up on your device asking you to accept or decline the transfer. If you accept the AirDrop, it will show up in the same app it was sent from
Don’t Miss: How To Change iPhone 5s Battery
Airdrop From Mac To iPhone
Before going ahead with the steps to AirDrop from Mac to iPhone, make sure that both iPhone and Mac fulfill the following requirements.
If your device meets above requirements, you can follow the steps as provided below to setup AirDrop on both sending and Receiving devices.
Option 1 How To Airdrop Photos From Mac To iPhone

Step 1. Go to “Finder” > “Go” > “AirDrop”.
Step 2. Drag and drop the photos you want to send from Mac to your iPhone to the image of the recipient and click “Send.” Or you can go to the Photos app, select the items you want to share, and choose the “Share” button > “AirDrop”, choose the recipient, and click “Done”.
You May Like: How To Turn Private Browsing On iPad
Setting Up Your Devices For Airdrop
To get the AirDrop party started between iOS devices running iOS 8 , launch the Control Center by swiping upward from the bottom edge of the display.
Tap the AirDrop icon to the left of the AirPlay icon . In the resulting menu, pick who you want to share files with: Contacts Only or Everyone. Tap Contacts Only and just the people in your Contacts app can see your device via AirDrop. Tap Everyone and anyone using AirDrop within about 30 feet of you can see your device. If youre trying to share images with someone who isnt in your Contacts app, its quicker to set AirDrop to Everyone than it is to add them to your Contacts app.
IDG
Tap the AirDrop icon circled here and the next menu lets you pick who to share files with . Tap Contacts Only or Everyone and the AirDrop icon turns white. Wi-Fi and Bluetooth are also automatically enabled if they werent already.
To use AirDrop between an iOS device and a Mac, or between two Macs, make sure Bluetooth and Wi-Fi are turned on. Your Mac doesnt need to be connected to a Wi-Fi networkWi-Fi simply needs to be turned on.
How To Turn On Airdrop
AirDrop is accessed via Control Center. To turn on AirDrop:
- Swipe down from the upper-right corner of your display if you have an iPhone X, or up from the bottom of your screen for earlier versions of the iPhone to open Control Center.
- 3D Touch the connectivity tile and a menu will appear.
- Tap AirDrop.
- Youll see three options: Receiving Off, Contacts Only, and Everyone.
- To turn Airdrop off, you would select Receiving Off.
- If you only want to receive AirDrops from your contacts, tap Contacts Only.
- If youre okay with receiving AirDrops from anyone nearby, tap Everyone.
Even if you select Everyone, you can choose to reject an AirDrop you dont want to receive when its sent to you.
Read Also: Erase Siri Suggestions
How To Enable Airdrop On A Mac
On your Mac:
Some Potential Risks Of Using Airdrop
Though AirDrop brings great convenience to users to move files, it also raises some problems. The biggest problem is privacy leakage. According to researchers at Germany’s Technische Universitat Darmstadt, if a user offers the “Contacts only” option for AirDrop, Apple devices need to silently request personal data from all devices within range.
That means your phone number and email address are possible to be learned by a stranger. Given that, we advise you to reduce the use of AirDrop. If you must move files, you can try some other transfer tools like EaseUS MobiMoverinstead.
Recommended Reading: Screen Mirroring With iPhone To Samsung Tv
How To Download Photos From iPhone To Mac Via Preview
Preview is the pre-installed software on Mac, so we can utilize it to download photos from iPhone to Mac without installing new software. You can transfer pictures from your iPhone just like from an external disk with the following method.
Step 1: Connect your iPhone to Mac with the original USB cable. Make sure the computer is able to recognize your device.
Step 2: After that you can open Preview and navigate to top menu bar and click on “File”. Select “Import from your iPhone”, which you can see all the photos in Camera Roll.
Step 3:If you just want to download several photos, select them and click the “Import” button on the bottom right corner if you need to download all the photos, just tap “Import All” to download photos from iPhone to Mac.
Select Desired Photos And Click Import
Once Photos is open on your computer, it will automatically start pulling up pictures and videos from your camera roll. On this screen, you can select individual pictures youd like to transfer to your computer. If you want to transfer all of them, click Import All New Items.
Once the import is complete, you can disconnect the USB cord.
| TIP: Learn how to turn off two-factor authentication on your Mac to make login easier. |
You May Like: How To Play 8ball On iPhone
How To Transfer Photos From iPhone To Mac With Easeus Mobimover
If you’re searching for an iPhone data transfer to replace AirDrop, try this iPhone data transfer tool – EaseUS MobiMover. As a comprehensive data transfer program, EaseUS MobiMover enables you to transfer over 20 types of data from iPhone to Mac. No privacy leakage happens. You can complete the whole process in a completely safe environment. Apart from that, it also allows you to manage iPhone data by backing up iPhone data, removing unwanted files from iPhone, transferring data between two iOS devices, etc.
To transfer photos from iPhone to Mac with EaseUS MobiMover:
Step 1. Connect your iPhone to Mac with a USB cable. Run EaseUS MobiMover, choose “Phone to Mac” and click the “Next” button to continue.
Step 2. Check the category/categories you want to copy from your iPhone to Mac. As you can see, you can copy other supported files together with photos from your iPhone to Mac all at once. After that, don’t forget to customize the storage path for the exported photos unless you want to save them on your desktop.
Step 3. Now, click the “Transfer” button to start transferring photos or other files from your iPhone to Mac without iTunes. Exporting files from iPhone to Mac with MobiMover is the right way for backup to avoid unexpected data loss.
How To Transfer Files From Mac To iPhone Via Anytrans

The process for moving data from your Mac to your iPhone is equally simple. See the steps below to find out how.
Step 1. and open it to the main interface screen.
* 100% Clean & Safe
Step 2. Follow step 2 as the above part. We will take Music as an example. Choose Audio > Music.
Step 3. To transfer music to your iPhone from Mac, click the Add Button When you click on the Add button, your file browser will open. From here you can select the items you wish to send to your iPhone, and you then click open. It couldnt be simpler.
Choose Files You Need to Import
Step 4. Select an app or apps to receive files you want to store > Then click Next to start.
Select an App to Receive Files
Step 5. When transferring finished, you can play it on your iPhone.
View the Transferred Files on iPhone
Read Also: How To Make Keyboard Bigger On iPhone 11