How To Instantly Share Photos Between iPhone iPad And Mac With A Pinch
This method allows you to quickly copy and paste images across Apple devices in a text field like Messages, Notes, Pages, email, etc.
- Requires Continuitys Handoff feature to be turned on
- Make sure WiFi and Bluetooth are turned on
- Works between Apple devices logged in with the same Apple ID
Check out the handy feature in action:
PLEASE tell me I am not the only one who didnt know about this feature
michael tobin
How To Download Photos From iPhone To Mac With Airdrop
AirDrop uses Wi-Fi to transfer files from iPhone to Mac and vice versa , which means first you need to be sure both your iPhone or iPad and computer are connected to Wi-Fi. Remember that AirDrop also requires a 2012 or later Mac model running OS X Yosemite or later to transfer photos from iPhone to Mac. To use AirDrop to export photos from iPhone:
Airdrop Pictures Between iPhone And iPad
Another straightforward way to transfer pictures from iPhone to iPad is through Airdrop. This may be one of the most commonly known and working tactics of transferring photos between two Apple devices. With Bluetooth enabled, photos, videos, texts, and more can be instantly shared with other Apple devices nearby.
To transfer photos, first turn Bluetooth and Airdrop on from the Control Centre. Select the photos to be shared from your album on iPhone. Tap on the “Share” icon with an up arrow at the bottom of the screen, followed by the Airdrop icon.
In the airdrop session, choose the name of your iPad. A window will appear asking you to decline accept the photos from ”the name of your iPhone”. Tap on Accept on your iPad. Then you can view the photos on your iPad.
Don’t Miss: How Do You Put An iPhone On Vibrate
Sync iPhone Pictures To iPad Using Itunes
iTunes is always the go-to software when it comes to syncing photos between computer and mobile phones. Now that iTunes has been replaced in macOS Catalina, you can use Finder to sync your photos, music and other files. No matter which application you use to transfer iPhone pictures to iPad, the process is uncomplicatedif you follow the right steps.
Note:
- Using iTunes to sync photos will erase all photos on your target devicethe iPad, and replace them with photos from your iTunes library.
- You can only transfer the photos from iPhone’s Camera Roll to iPad.
Step 1: Import the photos on iPhone to your computer
Connect your iPhone to your computer. Tap on Trust and type in the passcode on your iPhone if necessary. Once the computer has been trusted, the Photos app will run on the computer automatically, if not, open it by yourself.
Windows users: click on Import button in the upper-right corner to let all the photos display on the screen of your computer. Check the photos you want to transfer in the Import Item window. Select a folder that you want to save the items to in the upper-left corner. Then hit on Import X of X items to begin the process of importing.
Mac users: click on your iPhone’s name from the list of devices. All the pictures from your iPhone will be displayed in front of you. Choose a folder to import your pictures to. Then click Import X Selected or Import All New Photos to import the photos you want.
Also see: How to recover deleted photos on iPhone
How To Import Photos From iPhone To Pc

Step 1. Link your iPhone with your computer using Apple lightning cable. Tap on “Trust” when prompted whether to trust this device on iPhone. Then Windows PC will treat it as a portable device and pop up the AutoPlay window.
Step 2. Select “Import pictures and videos”, you can access your iPhone Camera Roll on PC. Hold the “Ctrl” key and highlight the photos and albums that you want to transfer to iPad, then drag and drop them to your desktop.
If the AutoPlay window does not show up automatically, click on “My Computer” on your desktop, locate to the “Portable Device” section, right click on your iPhone and you will see “Import pictures and videos” on the menu bar.
Users are not permitted to access iPhone Camera Roll folder on Windows 8/8.1, instead you will be presented two options after clicking on Import pictures and videos, Review, organize, and group items to import, and Import all new items now. If it is the first time to download photos from iPhone to computer, you’d better select the former. Hit the “More options” link and select a location to save iPhone pictures, click “Next” button and then press the “Import” button to import pictures from iPhone to PC. Then you can transfer photos from iPhone to iPad with iTunes
Don’t Miss: Changing The Font On iPhone
Option : Using Airdrop
AirDrop is a pre-installed program on iDevices and Mac to be used to share content among iPhone, iPad, and Mac in a wirelessly, including photos, videos, music, notes, and more.
Step 1: Turn on AirDrop, Wi-Fi connection, and Bluetooth on both iPhone and iPad within the Control Center.
Step 2: Open the Photos app on your iPhone. And select the photos you want to sync to the iPad, tap the “Share” button, and then tap AirDrop and choose your iPad. AirDrop will start to send photos from iPhone to iPad.
Step 3: Go to your iPad and tap the “Accept” tab on the pop-up to receive photos from the iPhone. When the process finished, run the Photos App on the iPad and check the updated files.
Related tips: How to transfer music from Mac to iPhone with AirDrop
Transfer Files From iPhone To iPad Using Airdrop
The AirDrop feature on iPhone makes use of Bluetooth technology to locate nearby devices and WiFi Network to transfer data between two Apple devices.
Hence, the first step is to make sure that Bluetooth is enabled on your iPhone and iPad and both devices are connected to the same WiFi Network.
On both devices, go to Settings> WiFi> make sure WiFi is enabled and both devices are connected to the same WiFi Network.
Similarly, go to Settings> Bluetooth> make sure Bluetooth toggle is set to ON position.
After enabling WiFi and Bluetooth, you will have to make sure that both devices are properly setup to receive files using AirDrop.
On both devices, go to Settings> General> Airdrop > On the next screen, select Everyone option.
This will ensure that both iPhone and iPad are properly setup to receive files using AirDrop.
You May Like: Block Email Messages On iPhone
Keep The Best Moments
Conveniently store your favourite photos on your Mac or PC. Drag and drop any pictures or videos from your iPhone and iPad to your computer – iMazing will even convert Apple’s new image format to JPEG if needed. No risky iCloud storage or confusing import procedures. Save what you need, just where you want.
Why My iPhone Cant Sync To iPad
Most of the time, the changes you appear on your iPhone may not appear on your iPad because your system status of iCloud is not synched properly. Sometimes the versions of two devices are not compatible, or you are not using the same Apple ID. Even your Wi-Fi and iCloud storage limits can also cause disruption.
You May Like: How To Delete Siri Suggestions On iPhone
Creating Beautiful Memories With Motif
Once youve transferred and reviewed your photos on a larger scale, why not turn some of your favorite images into a treasured photo book? With over 80 personalized layouts and the option to choose backgrounds and sizes that suit you, a photo book is a great way to celebrate and share your favorite photographs with family and friends. Download the app today.
What did you think of this article?
Transferring Photos From iPhone To iPad With Usb
You can also use a USB-C cable to transfer your images from your iPhone to your iPad. Heres how.
1. Plug the USB-C end of the cable into your iPad, then plug the other end into your iPhone.
2. Unlock your iPhone, then select Allow from the pop-up. An Import screen will automatically appear on your iPad.
3. Select the images youd like to import from your iPhone and select Import.
Read Also: Remove Siri Suggestions
Way 3 How To Airdrop Photos From iPhone To iPad
To make it easier for its users to move their content from one iOS device to another wirelessly, Apple introduced a dedicated AirDrop feature.
With it, you can share several files between Apple devices. All you have to do is enable the feature on both of the devices and then share photos from one device and those photos will be quickly available on the other device. You could also use AirDrop to transfer songs from iPhone to iPhone.
Steps to AirDrop Photos from iPhone to iPad:
Step 1. Go to Control Center on both your iPhone and iPad.
Step 2. Turn on AirDrop on both the devices and turn on Wi-Fi and Bluetooth.
Step 3. Choose Everyone on the menu.
Step 4. Launch the app on your iPhone. Then, click Select in the upper right corner and select the photos you want to transfer.
Step 5. Tap on the button and tap the name of your iPad.
Step 6. Click Accept on your iPad to confirm.
Step 7. After the photo-sharing is finished, the photos are saved on your iPad and you can view them as you like.
The disadvantage of this method is that it is not friendly for bulk transfers. So, if you want to copy multiple photos from PC to iPad using a quick and straightforward method, go back to Way 1 to do it.
How To Transfer Photos From Computer To iPad Via Itunes

iTunes is a default choice to transfer photos from computer to iPad for many people. Let’s see how it works:
Step 1: Launch iTunes on your computer, and then connect your iPad to computer via a USB cable. Select the iPad icon located on the top-left of the menu.
Step 2: Click under the Summary tab on the left. And then go to Sync Photos box.
Step 3: Select Choose folders. On the pop-up window, find the folder that stores the photos you want to transfer and then click Select folder to confirm.
– Step 4: Click Apply to transfer photos from computer to iPad.
In this way, if you add new photos to your folder on the computer, they will sync to your iPad automatically whenever your iPad is connected to the computer. It sounds very convenient but given the limited storage on iPad, it may not be a very ideal way to transfer your photos from computer to iPad.
Recommended Reading: Change iPhone Picture Resolution
How To Download Pictures From iPhone To Computer With Icloud Photos
The process for setting up iCloud Photos is similar to Photo Stream. Enabling iCloud Photos will store all of your photos in your iCloud account, not merely the most recent. This can rapidly use up your iCloud storage space unless you pay Apple for more. On the other hand, your photos from your computer and your iPhone will all be safely backed up in the cloud, and the process for how to transfer photos from iPhone to computer will be practically effortless, since iCloud will keep the two libraries in perfect sync.
On your iPhone:
How To Transfer iPhone And iPad Photos Using The Windows 10 Photos App
If you’d like to import all photos from your iPhone or iPad at once, you can use the handy Photos app that comes standard with Windows 10. Here’s how to do it.
Click Import. It is located in the top-right corner of the window.
Don’t Miss: How To Stream iPhone To Samsung Tv
How To Transfer Photos From iPad To Mac Via Airdrop
The easiest way to share one or a few photos between Apple devices , regardless of whether they are all yours or belong to your friends, is with AirDrop Apples proprietary feature, which uses both Bluetooth and WiFi for getting the data across.
Heres how to transfer files to iPad from an iPhone:
Make sure your WiFi and Bluetooth are turned on
Open the Photos app on your iPhone
Select a photo youd like to send over. For multiple photos, choose Select first in the top-right corner.
Tap the share icon at the bottom
Tap on AirDrop
Choose the person or device youd like to share the photos with
Similarly, heres how to transfer photos to iPad from Mac:
Turn on your Bluetooth and WiFi
Right-click on the photo you want to share, select Share, and then AirDrop
Choose the person youd like to send the photos to
AirDrop is by far the best way to share a few Mac or iPhone photos with your iPad. But what if you have a whole album or library you want to transfer to iPad?
How To Save Photos From iPhone To Mac
Step 1. On your Mac computer, the Photos app should start automatically as soon as you plug your iPhone into your computer. If you find your iPhone won’t connect to iTunes, try again to connect it. Keep your iPhone unlocked, and tap on “Trust” when prompted if to trust this device on the screen.
Step 2. Locate to the left hand column on Photos for Mac, click on your iPhone to display all photos in your Camera Roll. Select the pictures that you’d like to sync to iPad.
Step 3. To import photos from iPhone to Mac, select a destination in the Import to box at top ribbon, and then click on the “Import Selected” button. If you want to download all photos in iPhone Camera Roll, hit the “Import All New Items” button.
Tip: If your iPhone is locked during the process, iPhone photos will not show up in Photos app on Mac.
Also Check: How To Print Text Messages From Icloud
Transfer Photos From iPhone To iPad Using Photo Stream
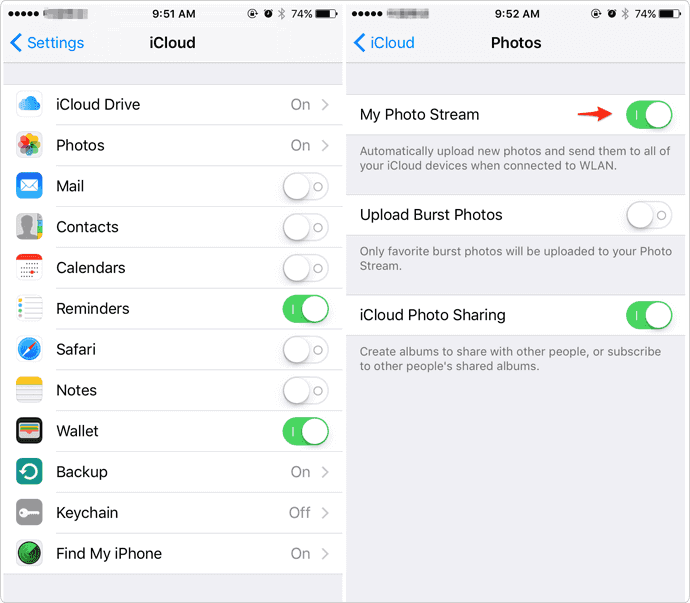
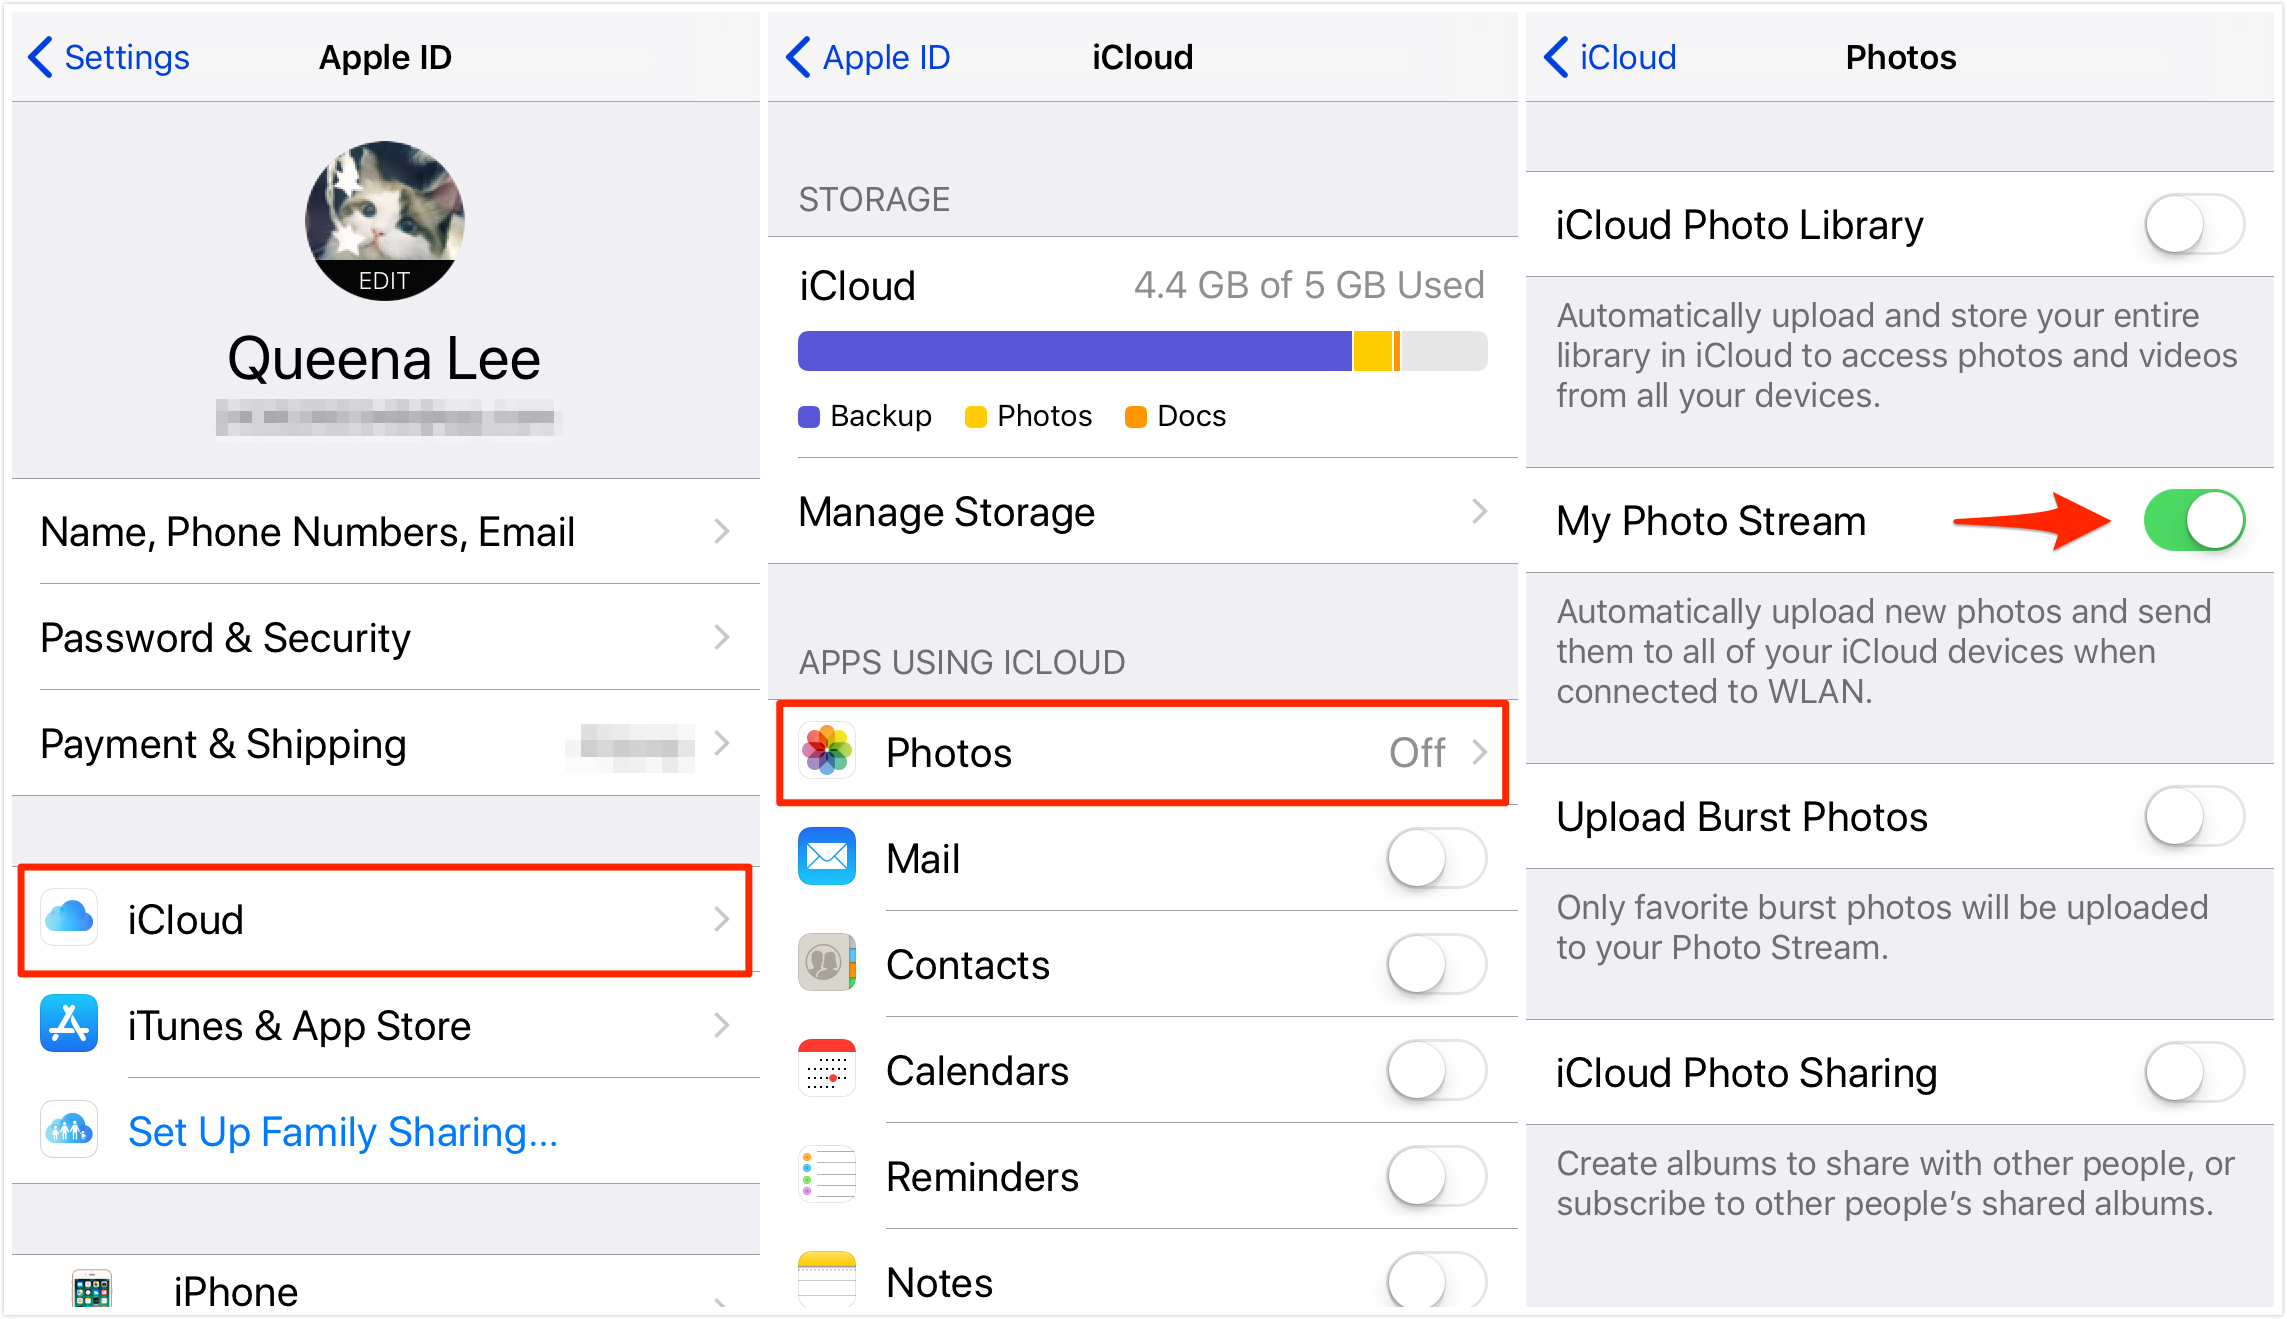
Therefore, it is not an ideal way to take a backup of your data. Though, if you simply want to access your photos on various iOS devices, then this would be a perfect solution. To learn how to get photos from iPhone to iPad instantly, start by unlocking your iPhone and visiting its Settings > iCloud > Photos. Turn on the option of My Photo Stream on it.
Repeat the same process for your iPad and wait for a while for your recent photos to be synced. Make sure that you are using the same iCloud credentials. Afterward, you would be able to access various uploads from the last 30 days on multiple devices seamlessly. Simply go to your iPad’s Photo Library and open the “My Photo Stream” album to view these pictures.
How To Transfer Photos From iPhone To iPhone Or iPad
There are a few different ways you can go about moving pictures from your iPhone to another device. The best method for you will depend mostly on how many photos and videos you want to transfer. Here are your options:
Read Also: Dollar Tree Lightning Cable
Sync Photos From iPhone To iPad Wirelessly With Icloud
To send pictures from iPhone to iPad with iCloud, please make sure that you have both your iPhone and iPad connected to stable Wi-Fi, as it needs a network connection to access photos or upload photos. Also, there are some preparations you need to make:
- Your iPhone and iPad need to be iOS 8.3 or later.
- Your iPhone and iPad should log into the same Apple ID.
- Make sure that you have enough iCloud storage space.
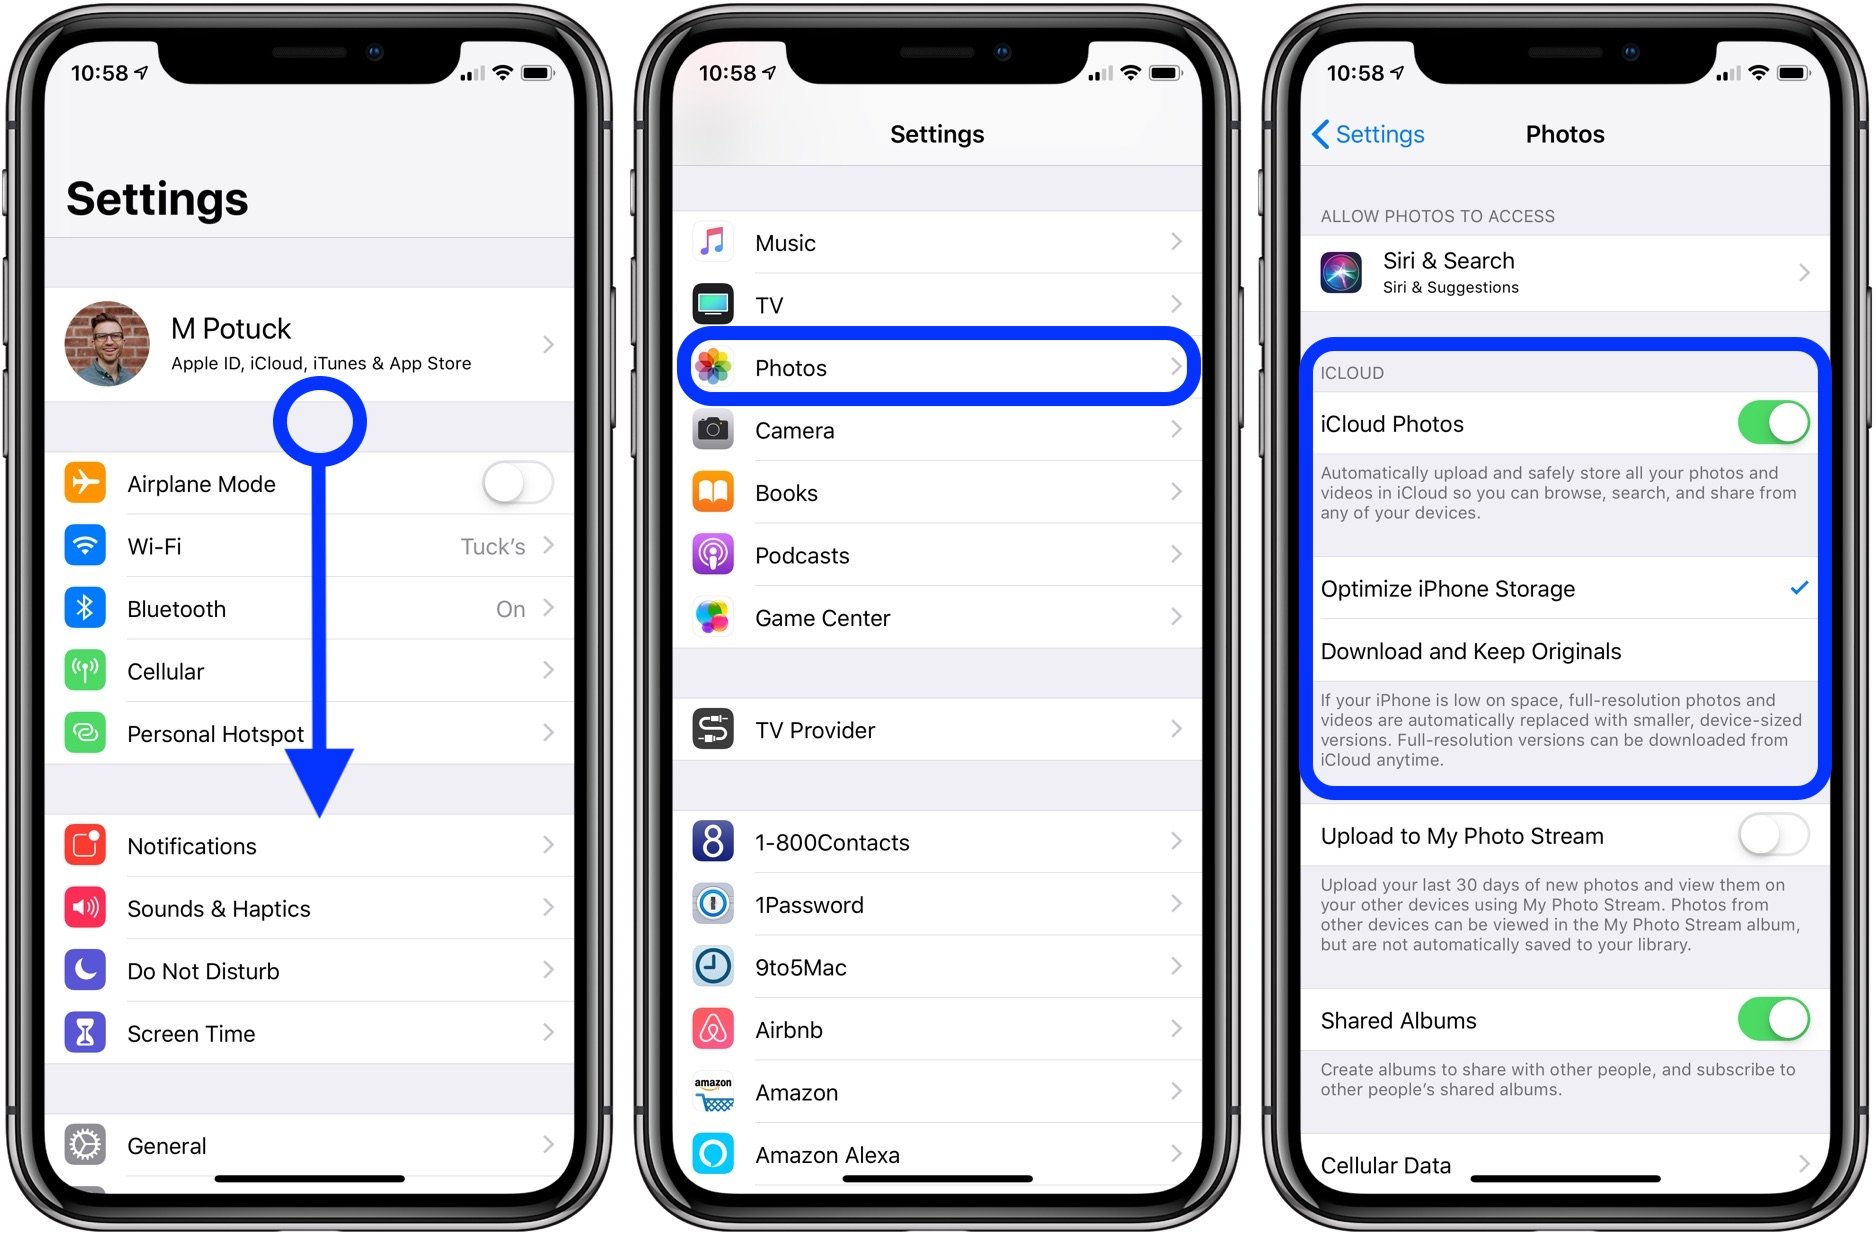
To Sync iPhone photos to iPad: Go to Settings > Tap on your Apple IDs profile part > Click iCloud > Tap on Photos > Turn on iCloud Photo Library. And repeat the same steps on iPad.
Transfer Photos from iPhone to iPad with iCloud
Further Reading:
How To Set Photo Stream Images To Automatically Download To Mac Or Pc

In MacOS Catalina you don’t have to do anything special. The Photos app on your Mac automatically saves your Photo Stream to your photo library.
In MacOS Mojave or earlier, follow these steps:
This way, even once photos leave your Photo Stream, they will be saved to your computer. You can also enable iCloud Photo Library on iPhone and computer if you pay for iCloud storage. Doing so will allow you to store your Photos in the Cloud, making them accessible online as well as on your computer.
Read Also: Remove Email From iPhone